Sprouts! Grow your own on your kitchen counter
This is the finished “crop” after just 5 days! I started the second jar after the 3rd day so I could keep them in stock in the refrigerator. So far we have had them on a Wedge Salad (added amazing flavor), Ground Sirloin Burgers (will never eat one without the sprouts again) and a Turkey and Cheese Spinach Wrap (YUM!)
You only need a few supplies like these to grow your Sprouts:
The gorgeous Jar, I found at TJ Max Home goods Store for $3.99. I bought two! Then I went on an internet mission and of course landed on Amazon.com. The Sprout Screen (which I recommend) is the best. It was $3.50. I also purchased the green sprout cap (plastic) and did not like it. So now I have ordered 3 more of the Stainless Sprout Screen. The Spouting seeds are a Salad Blend for $14.50 the seed blend contains Alfalfa, Radish, Broccoli and Clover. I love it! You can taste the radish and it really spices up the salad or anything you use it with.
Start with 2 Tablespoons of seeds, add to jar, secure screen in lid and rinse several times with water. Fill jar 1/2 way with water and set on counter overnight. Drain water off and rinse 3 times and drain all water out. Lay jar on its side at an angle as in the above picture on the counter. My jar is sitting in a salad bowl. I live in Arizona so my kitchen is full off sunlight, so make sure you do have some natural light near. Rinse 2-3 times a day filling and shaking the container to make sure they are well rinsed then place back on its side to drain and grow! By the 4th or 5th day, your jar should be packed!
The Sprouts are ready to harvest! Just grab a big mixing bowl and pull all of the sprouts from the jar and fill the bowl with fresh water. Swish them around a bit and the hulls will float to the top. I used both a small strainer and a big spoon the skim them off. You may need to do this twice (I did). The drain well and repack your jar and secure with a solid lid (the ones they come with 🙂 And you are ready to eat them!! Here is a Turkey Spinach Wrap I made for lunch featuring the sprouts! The wedge salad last night was terrific as well just added the sprouts on top of the dressing before the salad was served. It got rave reviews from the home front. You can add sprouts to just about anything including soups and on top of pasta salad (I am doing this next). Get creative!!
Jalapeno Cheddar Cheese Bagels
We have added a few new favorite flavors to our morning bagels. After my last visit to the local bagel shop, I spotted a few I just knew we would love and I could make them with our own array of peppers growing in the backyard.
This is the finished product! In the back are the Everything Bagels with Parmesan Cheese (my personal favorite), which are another new addition in the favorite category. We have been growing our own peppers for a couple of years now and we used the Cajan Bell Peppers fro these. They are miniature Green Bell peppers which pack a huge punch. The may be a little hotter than the Jalapeno so I decided to use them both. They turned out awesome!! Check out pictures of the Pepper Plant, this plant is 2 years old and we picked 8 nice size peppers yesterday.
Just start with this simple Bread Machine Bagel Recipe from All Recipes.com. I featured it here Bread Machine Bagels.
-
1 Cup warm water
-
1 1/2 teaspoons Salt
-
2 Tablespoons granulated Sugar
-
3 Cups Flour
-
2 1/4 Active Dry Yeast or 1 packet
Turn on your Bread cycle and let the machine do all the work! After the cycle ends, pull out the dough and shape into a ball. I Let it rise for about 40 minutes. Cut dough into six equal pieces and knead into a smooth ball. Push your thumb through the center and start stretching the center until you have a good size round rope going. Place all six on floured board to rise another 30-40 minutes.
Boil a large pot of water and add 3 Tablespoons granulated sugar. Preheat oven to 500, yes 500 degree’s. Prepare a baking sheet with parchment paper (for the easy cleanup) sprinkle cornmeal o it so the bagels will not stick and get your toppings ready as well. Drop 2 bagels at a time into the boiling water for 30 seconds then flip and continue to boil for an additional 30 seconds. Remove from water and place on folded dishcloth to drain. Repeat with the other 4 bagels in 2 more steps. Once the bagels have drained, place on the baking sheet.
I use milk to brush on the tops as mine are Egg Free. No need for all that mess either. Then get creative!
Bake at 500 for 5 minutes then turn baking sheet 180 degree’s and put back in oven and reduce temp to 450 degree’s. Continue baking for an additional 5 minutes. Then they are ready to come out!
There you have it! I made 3 Jalapeno/Cheddar and 2 Everything Bagels with Parmesan Cheese and 1 Sesame Seed, well just because they are so good just like that. Let them cool and store in a bag in the fridge since they have dairy on them (I am a freak about that stuff). We bought a bagel slicer, fondly known around here as the “Guillotine” at Bed Bath and Beyond. It is handy and no one gets cut!
Enjoy!
Garlic Beer Wings with Franks Hot Sauce
These were hands down the best wings we have ever had, and they are baked! Who doesn’t love garlic, beer marinated anything?
Once you get the craving for good spicy wings that just fall off the bone, you go on the internet and research every which way you can make these. (That is what I do!) I found in my research, that beer and garlic are a must in the beginning. So that is how I started. I purchased 3 lbs of Chicken Drummets for $4.32 and washed those babies up and put them is a 1 gallon bag, added 1 beer (Stella because that is what we have) and chopped 3 cloves of garlic and added to the chicken and beer. Seal that up and refrigerate for 24 hours. I did try this with 4 hours and they were good, but trust me the flavor was awesome at 24 hours!
Now we have had great garlic beer wings at a little local place in Litchfield Park, AZ across the street from the Wig Wam Resort. This little place is called “Taps“. We seriously love them! That is how this started. I love to replicate great dishes or get as close as I can.
Next, I had to come up with a spice rub. and here it is.
Garlic Beer Wings Rub
2 Tsp Kosher Salt
1/2 Tsp Celery Salt or Powder
1 Tsp Paprika
1 Tsp Chili Powder
1 Tsp Black Pepper
Mix together and sprinkle on the Wings or Drummets after 24 hours. Drain the wings first and spray a foil lined baking sheet with oil, then spray the wings with a light coating, sprinkle rub and turn over to get them nice and coated. Bake at 425 for 30 minutes. Turn them over and return to oven for 25-30 minutes. These babies are gonna smell great!
Meanwhile in a small sauce pan, melt 1/4 cup butter. Add 3/4 cups Franks Redhot Sauce and stir to mix and heat thoroughly. When wings come out of the oven, add 1/3 cup beer and stir in. You want to add this last so you do not cook it all off (preserve the Beer taste).
Place 4-5 wings at a time in large metal mixing bowl (this works great) add some wing sauce and start tossing around the bowl to coat. and then start platting the wonderful wings! That is it!
Enjoy
Roasted Tomato Soup
I have been craving a good Tomato Soup. Something that would satisfy my craving for Basil as well. This soup did it! I love all off the Roasting going on first, just makes the soup. I have lots of Basil growing in the big pot on the patio, I planted the small baby plant in the spring and now it is a HUGE bunch!
Start by cutting up 3-4 tomato’s, I used 4 Roma’s. Quarter them and lay on flat sheet covered with foil. Cut 1/2 yellow onion into wedges and add to the pan. Then 3 cloves of garlic, halved, tucked into the tomato pieces. Pour about 1-2 Tablespoons of Olive Oil over the veggies. Salt and Pepper and sprinkle with fresh Parsley (from my little garden). Then place into the oven at 350 for 30-40 minutes.
Now heat 1 can of low sodium Chicken Broth in good size sauce pan. Add 1 Tablespoon tomato paste (I use the kind in the tube). Heat on medium low heat and stir until well blended. Add the Roasted Veggies and simmer for about 10 minutes.
Now use your immersion blender or tall blender to mix the soup together to your desired consistancy. I wanted it to be “Rustic”, kind of thick. Then add 1/4 cup Half and Half and stir and simmer for another 5 minutes.
I ran back out to the Garden and picked the Basil and tossed it on top of the soup one it was in the bowl.
This was so GOOD! And super easy. I have been juicing and have not had a lot of solid food for a week and this was just perfect.
This recipe came from The Sprouted Kitchen Blog and you can find it right here: http://sproutedkitchen.com/?p=3186
Enjoy!!
Grilled Caprese Sandwich with Broiled Beefsteak Herbed Tomato’s
OH MY was this good!!!
I decided to combine a few different recipe idea’s and come up with a new Sandwich which turned out to be a HUGE hit! I started surfing one of my favorite food blogs, The Noble Pig, and found this recipe http://noblepig.com/2011/05/21/basil-spaghetti-with-cheesy-broiled-tomatoes.aspx. I have been craving anything Caprese lately since the Reluctant Entertainer featured on her Friday Roundup, on July 29th, the Caprese several different ways. One of the recipe’s was my Caprese Wrap!! http://reluctantentertainer.com/2011/07/re-friday-round-up-caprese-salad-served-many-ways/.
SO here is the new sandwich after I added the Balsamic and before the cut.
I started with 2 Beefsteak Tomato’s cut into thick slices (3 each tomato), sprayed a sheet of foil on a cookie sheet, seasoned the slices with salt, pepper and a little oregano. Then chopped a small amount of fresh mozzarella and a sprinkling of Parmesan cheese. Popped them under the broiler for 3 minutes. Here they are sliced and seasoned
For the each Sandwich:
Deli sliced bread of your choice
3 thin slices of Prosciutto
3 thin slices of Fresh Mozzarella Cheese
1 thin slice of Havarti Cheese
Heat non stick skillet to medium high, place the Mozzarella on one slice of bread and the Havarti on the other with the Prosciutto in the middle. Grill until cheese starts to melt and bread is lightly grilled. Then add:
3 Broiled Tomato’s from above
6 fresh Basil Leaves
Place back in the hot Skillet for a minute or 2 on each side to melt together.
Then plate the sandwich and open it up and lightly sprinkle with Balsamic Vinegar to your liking. Cut in half and enjoy!!
Chicken Salad Wrap with Creamy Italian Dressing & Havarti Cheese
This is a go-to quick and easy lunch I make often. When I bake Chicken Breasts in my Dijon, Honey, Worcestershire Sauce and White Wine Vinegar Marinade, I ALWAYS throw a few extra in for wraps.
I used about 1/3 of a Baked Chicken Breast, Chopped for this Wrap.
Recipe for Chicken Salad Wrap with Creamy Italian Dressing and Havarti Cheese
1 Spinach Wrap Tortilla (I used Mission)
1/3 Cup chopped cooked chicken breast
2 Tbsp Cream Cheese
2 Green Onions, diced
Lettuce chopped, I used Iceberg you can use any on hand. I used about 1 cup
2 Slices of Havarti Cheese from the Deli
2 Tbsp Marie’s Creamy Italian Dressing
Start out by laying down a sheet of wax paper and place the Spinach Wrap in top, this will make it so much easier to roll and keep those yummy ingredients inside. First spread some cream cheese on the tortilla, then add the green onions, cheese, lettuce and chicken. Top with the dressing, I used a small spatula. Assemble as shown in the above pictures and roll it up! I then cut it in half on a diagonal. Then enjoy!
Turkey Bacon Club Wrap
I have been craving a Club Sandwich for about a week now and I have not given in to my craving because I am trying to cut back on alot of bread. I picked up some sun dried tomato wraps the other day and decided to give them a try with turkey, bacon and lettuce filling.
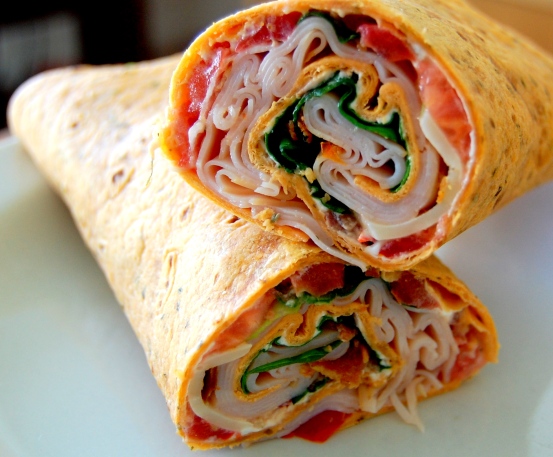
Turkey Club Wrap
Turkey Club Wrap
1 Sun Dried Tomato Tortilla Wrap
1-2 Tbl Whipped Cream Cheese
1 Tbl Diced Red Bell Pepper (if yu like the added flavor, I do!)
1-2 Tbl of Crumbled Bacon
A couple of shakes of Italian seasoning
5 Slices of Roma Tomato (Thin)
Baby Spinach Leaves
Iceberg or Romaine lettuce leaves
2 Thin Slices of Baby Swiss Cheese
Thinly Sliced Turkey Breast to Cover Filling
Assemble as shown. I start with a sheet of wax paper to prepare the wrap on and when I have finished with the sliced turkey over the top, roll the wrap as tightly as you can and the roll the whole wrap in the wax paper and fold the ends. Refrigerate about 30 minutes and the unroll and slice in half. I sliced mine in about 1 1/2 inch slices to make it easy to eat on the run or just not as messy. Yum! I will definitly make this again to take to the office for lunch.

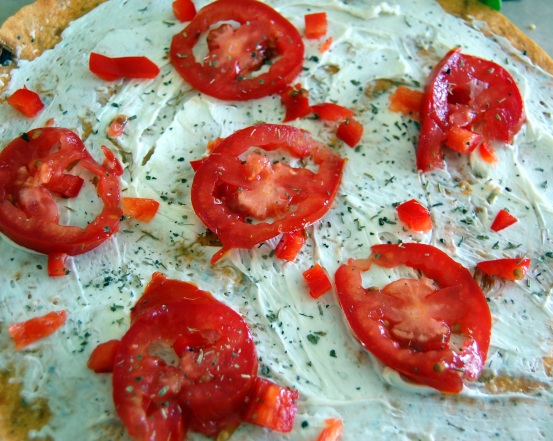
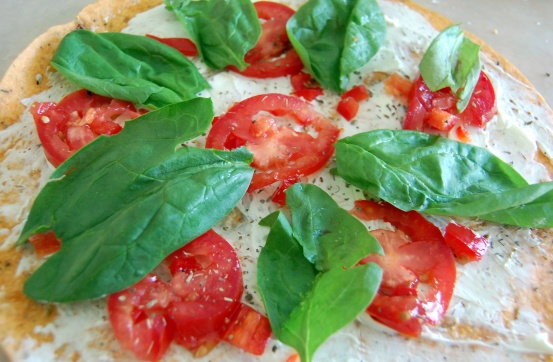


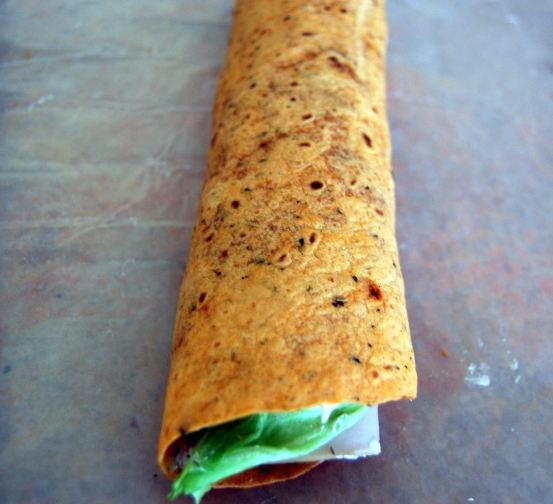


This was so good that I will make another tonight to grab in the morning for tomorrows lunch!
-
Recent
- Poblanos Stuffed With Cheddar & Chicken
- 974
- Apple Blueberry Enchilada’s, Really!!
- Sprouts! Grow your own on your kitchen counter
- Enchilada’s with Roasted Vegetables served Lasagna Style
- Jalapeno Cheddar Cheese Bagels
- DIY Earth Box! Make it yourself
- Chicken Pot Pie with Large Buttermilk Biscuits
- Garlic Beer Wings with Franks Hot Sauce
- How to stop Facebook from sharing your location | How To – CNET
- Roasted Tomato Soup
- Grilled Steak with Mushroom Tarragon Cream Sauce
-
Links
- WordPress.com
- Simply Recipes
- Recipe Link
- Reelsoundtrack.com
- Lake Elsinore Storm
- Minor League Baseball Site
- Major League Baseball site
- Myrecipes.com
- Martinis Online
- A Food Lovers Journey
- Food Gawker
- Arizona Diamondbacks
- LastFM
- Lifetips Juiceing Recipes
- Living & Raw Foods 20 great Juice recipes
- Brown eyed baker
- Mixingbowl.com
- Lunch Box Bunch
- A cat in the kitchen
- Picky Palate
- Photograzing
- Tastespotting
- Recipes2Share
- Feasting in Phoenix
- Eugene Emeralds
- Daily Unadventures in Cooking
- Just Jeanene's Favorite Places, People and Things..
- The Pioneer Woman Blog
- Refrigerator Soup is a Photo Collection of Beautiful food Photo's
- Pinterest!
-
Archives
- November 2012 (1)
- August 2012 (1)
- July 2012 (1)
- June 2012 (1)
- May 2012 (2)
- April 2012 (1)
- March 2012 (1)
- January 2012 (1)
- December 2011 (1)
- October 2011 (1)
- August 2011 (4)
- July 2011 (1)
-
Categories
-
RSS
Entries RSS
Comments RSS


